Putting the Purple Coo widget on your blog
Here is today's tutorial; I really enjoy doing these, though I always feel slightly guilty about the time it takes to do when I no doubt could and should be doing something else - pity I can't do it for a living.
So, if you want to put the clickable Purple Coo link like the one at the right on your blogpage, you will need to add the appropriate code to the right place on your blog customization page - DON'T PANIC! Here are the steps to take - I suggest you read it through first then try it.
1. You will need to copy the contents of the box of code below and then paste that code somewhere else.
2. To copy the code:
Either right-click in the box, choose Select All if available, right-click again and choose Copy,
Or left-click in the box, then CTRL-A (to select all) then CTRL-C (to copy) - can't remember the Mac route, but Mac users will know.
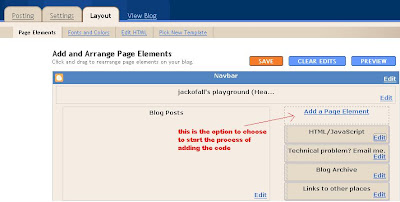
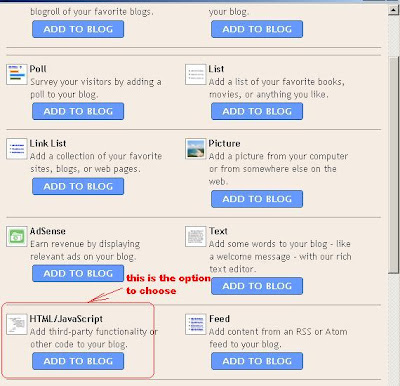
 4. Your blog's layout may be different, but at the top of one of the sides there should be the option to Add a Page Element, as pictured above - click that and you will get the page pictured below. Again, click to enlarge:
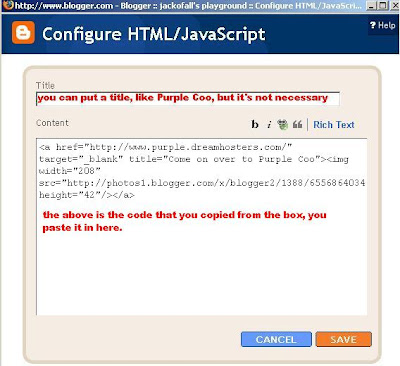
 5. When you click on the blue ADD TO BLOG button for the HTML/Javascript option shown above, you will get to the Configure HTML/Javascript page, as shown below:
 Once you paste in the code that you've previously copied, click on the Save button and then view your blog - if things have gone according to plan the clickable Purple Coo banner should now be on your blog's side column. If it's not, try again or email me and I'll try to help.