Saturday 19 May 2007

Slideshow tutorial

At bottom right of mountainear’s slide display (or mine) click the little button marked 'slide' ringed in red:


That will take you to the Slide website’s opening page, as below (click on image to enlarge, then Back to return):
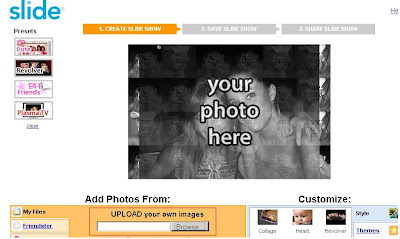

Down the bottom of that, browse to photos you have on your computer and upload one at a time. Each time you upload one the display above will show how it will appear (click on image to enlarge, then Back to return):


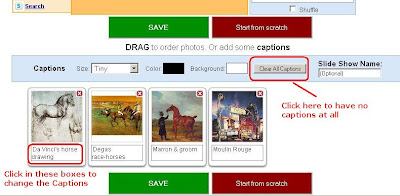
As you add photos, they will appear down at the bottom of the Slide window, so scroll down and see what you can do, be it adding Captions to each image, changing the size and colour of the Caption text and background or even choosing to have no captions at all, and the changes will take place as you make them (click to enlarge, Back to return):

When you’ve uploaded as many photos as you want, click on either of the green SAVE buttons, and you will be taken to the Sign Up page (click to enlarge, Back to return):
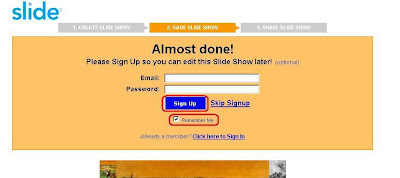

It’s probably a good idea to sign up so you can edit later, and remember to tick, or keep ticked, the box marked Remember Me, Then click the blue Sign Up button and you will be taken to the Share your slide show page, which is probably the most awkward part of the procedure (click to enlarge, Back to return):
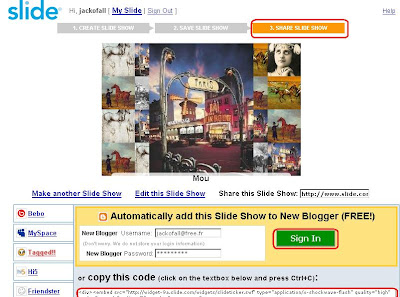

Below the bit I’ve been able to copy are the instructions for copying and pasting the code into a blog post, so it shows up on your blog – I tried the 'Automatically add' section but it didn’t seem to do anything, so the second section, copying the code (which is all explained on the page) is a better route to follow, I think.

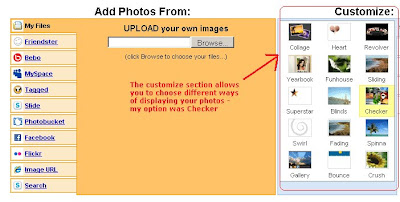
It took me several times to suss it out, but I'm sure you, like me, will get there in the end. Have fun, particularly with the Customize option, shown below, which allows different ways of presenting the photos.
Loufoque slideshow

Here's one I made earlier. Why not have a look at the instructions for making one yourself?

Tuesday 8 May 2007

Putting Avatars/profile pictures on Blogger

It takes much less time to do than to type, so don't be put off.

To get the photo online that you want to use as your avatar/profile image in your Photo URL on Blogger you first need to upload the photo/s you want to a website -the one I use is http://photobucket.com. On the opening page, click on the red join now button and it takes you step by step through the (free) signing up procedure and tells you what to do. Only two stages, then click the I accept. Sign me up! button and you're done and ready to upload. There are helpful popout tips that tell you what you should do the first time.

For the photo you want to upload, click on Browse, then (if you've got a PC, I can't speak for Macs, but it may be similar) navigate to the photo you want, click it to make it go into the File name box of the File Upload dialogue window that opened when you clicked Browse, then click on Open to put it onto the Photobucket upload screen. A green tick will appear and you can click in the white space beside it to give that picture a name. Now click Upload and the photo will be uploaded. When the screen refreshes, your photo will be down the bottom in your album, so scroll down to see it. See image below.

image from photobucket.com
(Click on image to get larger size, then Back to return to article)

Click on your photo to give you options for what you can do with it. One of those is Resize,

image from photobucket.com
(Click on image to get larger size, then Back to return to article)

click on that and then click on Avatar

image from photobucket.com
(Click on image to get larger size, then Back to return to article)

- you will be asked if you're sure you want to do this (it can't be undone, but the original photo is still on your computer, so it won't be changed), click OK and it will be resized to the right dimensions.

Once the screen refreshes it will say Image resized, and down on the bottom right are three text fields: URL Link, HTML Tag and IMG Code.

image from photobucket.com
(Click on image to get larger size, then Back to return to article)

The one you want is the first, URL Link, single left click in that text field and the code will be copied to your clipboard. Open up Edit Profile in your Blogger account and in the Photo URL box rightclick and Paste, the code will go in there (or CTRL-V for PCs, apple/function-V for Macs). Save the profile changes and you're done. Next time your profile is opened, it will have found the picture at Photobucket and put it on there.

Saturday 5 May 2007

Positoning pictures

160x131This is the first picture, uploaded using the options layout left and small size and lots of repeated text to show the flow of words around it. This is the first picture, uploaded using the options align left and small size and lots of repeated text to show the flow of words around it.This is the first picture, uploaded using the options align left and small size and lots of repeated text to show the flow of words around it.This is the first picture, uploaded using the options align left and small size and lots of repeated text to show the flow of words around it.This is the first picture, uploaded using the options align left and small size and lots of repeated text to show the flow of words around it.This is the first picture, uploaded using the options align left and small size and lots of repeated text to show the flow of words around it.This is the first picture, uploaded using the options align left and small size and lots of repeated text to show the flow of words around it.

160x131New paragraph, and above is where I want to put my second centred picture. Upload that using options layout centre and small, and it appears at the top, in the centre. Right click it, choose Cut, move your cursor to where you want it positioned, Paste. More repeated text to demonstrate. New paragraph, and above is where I want to put my second centred picture. Upload that using options centre align and small, and it appears at the top, in the centre. Right click it, choose Cut, move your cursor to where you want it positioned, Paste.New paragraph, and above is where I want to put my second centred picture. Upload that using options centre align and small, and it appears at the top, in the centre. Right click it, choose Cut, move your cursor to where you want it positioned, Paste.

Final paragraph, and I want picture bottom right. Type your text, to the right of which you will have your picture. Then upload your picture, Layout right, size small. It will appear at the top again, but on the right. Rightclick, cut and position your cursor at the start of your final paragraph, Paste picture. 160x131Check your Preview to see if this last one is where you want it, if not you can manouevre this picture up and down by rightclicking, cutting and pasting elsewhere amongst the words of the final paragraph, the words of which will adapt and flow around it. Finished. Final paragraph, and I want picture bottom right. Type your text, to the right of which you will have your picture. Then upload your picture, Layout right, size small. It will appear at the top again, but on the right. Rightclick, cut and position your cursor at the start of your final paragraph, Paste picture. Check your Preview to see if this last one is where you want it, if not you can manouevre this picture up and down by rightclicking, cutting and pasting elsewhere amongst the words of the final paragraph, the words of which will adapt and flow around it. Finished.


Positioning pictures Part 2

The picture I'm going to upload has original dimensions of 640 width x 480 height. I'm going to upload it with the three options available: small, medium and large, to see what it looks like.

Here's Small, positioned left:

200x150


Now Medium:

320x240


Now Large:

400x300

Friday 4 May 2007

Putting the link to your blog in a comment

If you want to put a link to your blog in a comment you make, say on the Announcement page at http://coochat.blogspot.com , you need to use the HTML code that's available. DON'T PANIC! It's not difficult, it takes longer to write than to do.

1. On your blog page, in the address bar at the top, right click and choose copy;
2. Go to the Announcement page and type your announcement. DON'T PUBLISH
3. Put the cursor just before the word/s you want to use to be the linking text and type <a href=" (the < symbol is next to the 'm')
4. After the = sign, paste the address you copied then type > (the > symbol is next to the < symbol)
5. After your linking words, type </a> (the / symbol is next to the > symbol)
6. Preview to see it looks like a link and shows you the address when you hover over it.
7. Publish

Party political broadcast

We've not lived in France long, compared to the French people who live here (well, d'uh!), and as non-French residents we don't have the right to vote in la presidentielle, but schools can be a rich fermenting ground for ideas.

Apparently (I was out to work today before the sun rose, as is normal every other week) youngest, 6, came downstairs to breakfast this morning and on entering the kitchen asked, generally, "So, who do you think would be the better president for France? I don't think Sarkozy would be very good for Brittany; on the other hand, Sègolène Royale isn't very good in international politics." First words he said, I am assured, and a pretty good recollection of what he said, though to be fair it was said in a mixture of French and English. All 3 children are bilingual and often forget their parents aren't, so they try to make allowances, when they remember.

Of course, proud but slightly bemused mother asked if this was because they'd been talking about the elections in class with maitresse. Replying with a look that said 'credit me with some intelligence' and with a sneer in his voice, he said, "No, we've been discussing it in the playground."

6 years old. I ask you.

Mind you, this is the same 6-year-old who went to his 8th dental appointment in 3 months the other day, and didn't want the replacement dentist while his own was en vacances, he'd become used to his own. His dentist is a young but balding chap of about 35 with a chin piercing, fortunately hidden from curious eyes and questions during treatment by his face mask. Eight visits so far, almost weekly save for the 2 week holiday break, because youngest has/had several holes (teeth formed too soft in utero, all bar four of top set taken out when he was 3), but the French dentists, or this one in particular (don't know if it's standard practice but it ought to be), believe in treating one hole per visit, and if it's a big hole, 2 visits, so the patient doesn't get deep-rooted fears of dentists - for youngest, it's worked, he's perfectly happy to go back for subsequent treatment, as long as it's the same man. And it's not private, but done on the Carte Vitale system.

Gradual introduction to the infliction of pain (his mother refuses to take him, she was badly treated on that front under the NHS) has obviously made him phlegmatic about changing situations - politics might well be one of them.

Thursday 3 May 2007

We were tuff in those days!!

CONGRATULATIONS TO ALL THE KIDS WHO WERE BORN IN THE 1920's, 30's, 40's, 50's, 60's and 70's !!
(written from an Australian perspective but still true nevertheless)

First, we survived being born to mothers who smoked and/or drank while they carried us and lived in houses made of asbestos.

They took aspirin, ate blue cheese, tuna from a can, and didn't get tested for diabetes or cervical cancer.

Then after that trauma, our baby cribs were covered with bright colored lead-based paints.

We had no childproof lids on medicine bottles, doors or cabinets and when we rode our bikes, we had no helmets or shoes, not to mention, the risks we took hitchhiking.

As children, we would ride in cars with no seat belts or air bags.

Riding in the back of a flat bed truck on a warm day was always a special treat.

We drank water from the garden hose and NOT from a bottle.

Take away food was limited to fish and chips, no pizza shops, McDonalds, KFC, Burger King or Red Rooster.

Even though all the shops closed at 6.00pm and didn't open on the weekends, somehow we didn't starve to death!

We shared one soft drink with four friends, from one bottle and NO ONE actually died from this.

We could collect old drink bottles and cash them in at the corner store and buy fruit tingles and some crackers to blow up frogs with.

We ate cupcakes, white bread and real butter and drank soft drinks with sugar in them, but we weren't overweight because......

WE WERE ALWAYS OUTSIDE PLAYING!!

We would leave home in the morning and play all day, as long as we were back when the streetlights came on.

No one was able to reach us all day. And we were O.K.

We would spend hours building our go-carts out of scraps and then ride down the hill, only to find out we forgot the brakes. We built tree houses and cubby houses and played in creek beds with matchbox cars.

We did not have Playstations, Nintendo's, X-boxes, no video games at all, no 99 channels on cable, no video tape movies, no surround sound, no mobile phones, no personal computers, no Internet or Internet chat rooms.......... WE HAD FRIENDS and we went outside and found them!

We fell out of trees, got cut, broke bones and teeth and there were no lawsuits from these accidents .

Only girls had pierced ears!

We ate worms and mud pies made from dirt, and the worms did not live in us forever.

You could only buy Easter Eggs and Hot Cross buns at Easter time.......no, really!

We were given BB guns and sling shots for our 10th birthdays.

We drank milk laced with Strontium 90 from cows that had eaten grass covered in nuclear fallout from the atomic testing at Maralinga in 1956.

We rode bikes or walked to a friend's house and knocked on the door or rang the bell, or just yelled for them!

Mum didn't have to go to work to help dad make ends meet!

Football had tryouts and not everyone made the team. Those who didn't had to learn to deal with disappointment. Imagine that!!

Our teachers used to belt us with big sticks and leather straps and bullies always ruled the playground at school.

The idea of a parent bailing us out if we broke the law was unheard of. They actually sided with the law!

Our parents got married before they had children and didn't invent stupid names for their kids like "Kiora" and "Blade"

This generation has produced some of the best risk-takers, problem solvers and inventors ever!

The past 70 years have been an explosion of innovation and new ideas.

We had freedom, failure, success and responsibility, and we learned

HOW TO DEAL WITH IT ALL!

And YOU are one of them!

CONGRATULATIONS!

You might want to share this with others who have had the luck to grow up as kids, before the lawyers and the government regulated our lives for our own good.

And while you are at it, forward it to your kids so they will know how brave their parents were.

Kind of makes you want to run through the house with scissors, doesn't it?!


PS -The big type is because your eyes are shot at your age