Tuesday 20 October 2009

Firefox extensions

What you use to view pages on the internet is called your internet browser and, for the moment, the most popular internet browser in use is Microsoft's Internet Explorer (IE). Version 8 of IE has recently come out (you'll see references to IE8 here and there, to distinguish it from previous versions, IEs 3, 4 5, 5.5, 6 and 7) and has apparently solved a lot of problems that earlier versions gave with viewing certain web sites as they were intended to be viewed by those who designed them.

Another internet browser, available on the open-source(=FREE) market, is Mozilla Firefox, known more often simply as Firefox or FF. This is now in version 3.5 (it's been round less time than IE) and Firefox users on both Windows and Mac platforms (ie, operating systems) are becoming more and more common among leisure-based computer users; people often find it simpler to use, less prone to crashing and more adaptable. 6 Reasons why Firefox is safe compared to Internet Explorer is an article that may help you decide if you haven't already made the change.

Firefox also has add-ons and extensions; think of these as bits of kit to make it more functional and useful. A recent list of 10 Firefox add-ons it's good to have has been put out and it's well worth a look. For bloggers and forum users, a particularly good one to have, and one I use almost daily, is BBCode - check it out, and the others.

Safe surfing!

Thursday 30 April 2009

Psst! Wanna clock for your blog?

For those of you who'd like to have a clock showing in their blog side bars, ie one of the three flavours as shown on the right of this blog post, here are the instructions for adding one. My clocks show French time, which is GMT+2/BST+1 (or CET - Central European Time - in American, all rather confusing), but each clock is configurable for your own time zone.

It's probably good idea, before you do anything else, to open your own blog in a separate window, so you don't have to navigate away from this one. The links given below will all open in separate windows by themselves.


Option 1 The above clock is from http://www.worldtimeserver.com and you can choose colours, time zones and sizes, with changes previewed on the screen in front of you. Annoying pop up when you hover over it is just a fact of life. The above choice of colour (the outside ring) was the Custom Hex code #cccccc - just type cccccc in the box provided; the change won't be shown for that colour until you click the Update HTML button.

To put the clock in your side column, you'll need Option 1: Object HTML code, just down the page. 1.Copy that code then, 2. once in your blog, go to Customize>Layout>Page Elements and click on the link to "Add a Gadget" to your Layout, look for the HTML/Javascript option (second choice down) and click the big blue + sign.. In the Configure screen that opens, you can give it a title (but you don't have to) and then paste the code you just copied into the Content box. 3. Save, and it's there.


Option 2 These second two are from http://www.clocklink.com, and they load on the page a little faster. Choice of colours is limited, though. Both are in the Analog section of the Gallery, the one on the left is number 0003, the wonky one on the right is number 0031; click the View HTML button underneath it, click the Accept button in the window that opens, make your choices and then copy the code in the top box and proceed as from 2. above.


Option 3 The last one, above, has no annoying pop ups, just a link symbol when you hover over where it comes from, which is http://24timezones.com - ignore the information in red saying they are undergoing technical changes and that the clocks are not available, they ARE. It is the one I had to fiddle about with most in order to get it to show here in the post screen, though it's easy to get in your side column; just go to the site, choose the variety you want, the one above is the Analog Flash Clock, (you need to choose the capital city of the country you're in - I can tell you how to get rid of that or put in your own city/town, if you're interested) and click the Get HTML code! button, click in the code box that opens, which will highlight and copy the code, then follow the steps from 2. in the first example above.

Wednesday 25 February 2009

Your very own Home page

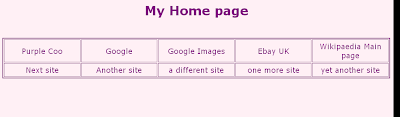
Thanks for at least having a look here, and carry on by being brave. As I said elsewhere, on my computer I have my own hand-made Home page with regularly visited sites on it for easy clicking and less hunting around in Favourites - it looks a bit like this:


It's very simple to do and doesn't require a great deal of effort, nor knowledge of the underlying computer readable code (HTML - HyperText Markup Language, for those who might be wondering), as I've done a lot of it for you and put in instructions.

Below is the code and below that the steps to take - go on, be brave!


<!DOCTYPE HTML PUBLIC "-//W3C//DTD HTML 4.0 Transitional//EN">

<html>
<head>
<title>Web Portal</title> <!--the words that will appear in the top blue bar of your browser - make them what you like-->
<style>
body {background-color: lavenderblush;}/*page background color*/
h1 {font-family: verdana, helvetica, arial, sans-serif;
color: purple;} /*font and color of the page title*/
table {border: 2px solid purple;
margin-top: 30px;} /*thickness and color of the border of the table and height from the top, respectively*/
td {border: 1px solid purple; /*thickness and color of the inner box borders*/
padding: 5px 10px;} /*spacing from top and sides of the link words*/
a:link, a:visited {text-decoration: none;
color: purple;
font-family: verdana, helvetica, arial, sans-serif;
font-size: 1.2em;} /*what the links look like when they're not hovered over and when they've been visited*/
a:hover {text-decoration: underline;
color: maroon;
font-size: 1.2em;} /*what the links do when you hover over them*/
</style>
</head>
<body>
<h1 align="center">My Home page</h1>
<table align="center">
<tr align="center">
<td width="20%">
<a href="http://www.purple.dreamhosters.com/common/">Purple Coo</a>
</td>
<td width="20%">
<a href="http://google.com">Google</a>
</td>
<td width="20%">
<a href="http://images.google.com/">Google Images</a>
</td>
<td width="20%">
<a href="http://www.ebay.co.uk">Ebay UK</a>
</td>
<td width="20%">
<a href="http://en.wikipedia.org/wiki/Main_Page">Wikipaedia Main page</a>
</td>
</tr>
<tr align="center">
<td>
<a href="#">Next site</a><!-- put the web address in place of the # and an easy name in place of the words between the > and < -->
</td>
<td>
<a href="#">Another site</a><!-- put the web address in place of the # and an easy name in place of the words between the > and < -->
</td>
<td>
<a href="#">a different site</a><!-- put the web address in place of the # and an easy name in place of the words between the > and < -->
</td>
<td>
<a href="#">one more site</a><!-- put the web address in place of the # and an easy name in place of the words between the > and < -->
</td>
<td>
<a href="#">yet another site</a><!-- put the web address in place of the # and an easy name in place of the words between the > and < -->
</td>
</tr>
</table>
<br>
<br>
<p style="font-family: verdana, helvetica, sans-serif; font-size: .8em;">To edit this page, by changing colors, adding websites etc, right-click on the Desktop shortcut for <em>this</em> page and choose Open With/Notepad. After you've made your changes, don't forget to Save the Notepad file so that they'll take effect, and if you don't like how it looks then open it again and have another play around!</p>

<p style="font-family: verdana, helvetica, sans-serif; font-size: .8em;">You will see that each web site has its own listing, and the code is fairly simple to follow: the second row of the table is filled with 'dummy' sites which you can replace with your favourites, just by replacing the &#35; with the web address of the site you want to put there and an easy name for it.</p>

<p style="font-family: verdana, helvetica, sans-serif; font-size: .8em;">If you want to change colors (it is always written the American way with HTML code), <a href="http://www.htmlgoodies.com/tutorials/colors/article.php/3478961" style="font-size: 1em; text-decoration: underline" target="_blank">here is a site with a large variety</a> which can be used by their names rather than any complicated codes.</p>

<p style="font-family: verdana, helvetica, sans-serif; font-size: 1em;">Have fun!</p>

</body>
</html>


1. Open a blank page in Notepad - Start/Programs/Accessories/Notepad (TextEdit for Mac users).

2. Highlight all the contents of the box above either by clicking in the top left of the box and dragging to the end, or by clicking at the top and then holding Shift and pressing the down arrow to the right of your keypad to continue highlighting down to the end.

3. Copy the highlighted text and Paste it into the blank page of Notepad.

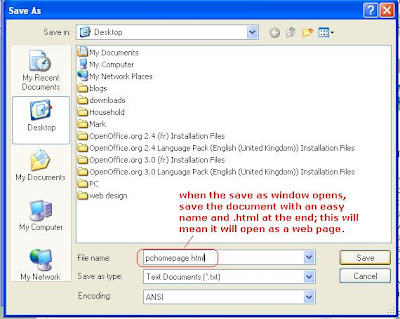
4. In Notepad, File/Save As... (see below picture)


5. Save it to your Desktop and name it as something you'll recognise, with .html at the end; this will enable it to open as a web document - see picture below.


6. Now if you go to your desktop and open that web page you've just saved, you'll get your own home page opening in your browser. And don't worry, there are instructions in it about changing things.

Wednesday 18 February 2009

Smileys and animated emoticons


http://anchoredbygrace.com/smileys/smileys1.html is the site where I got a lot of these, have fun searching through the pages there for others.

Thursday 29 January 2009

Putting pictures in a PC forum post

This is a similar tutorial to that done already on the Support page of the forums at PC, but I'm doing it here so that those interested can, if they wish, have this tutorial open at the same time as trying to put it into practice on the PC forums.

The first point to make is that although in the PC Common Room you can post a picture either from your computer or from somewhere on the Net, in the forums you can ONLY post an image which is already online. That means that the image needs to have been uploaded to some sort of online storage, but don't get too concerned; following this tutorial's steps means you won't have to worry about the ins and outs of online photo storage sites like Photobucket or ImageShack (unless you want to, of course), because we're going to use Purple Coo itself as the (temporary) storage facility: This tutorial is for those who have pictures on their computers, but not online, that they wish to post in the forums.

Step 1
If you've come to this tutorial from the forum post Put your pictures in the forum, you should already have the forums at PC open in another tab or on another browser page; if not, open another browser tab/page so you can work through the tutorial. Click on post reply for the forum topic you want to post a picture on. Start typing your forum post. When you get to the point you want to insert your picture, Preview your post, but don't close it, and go to the Common Room using the link at the top of the forums page. As far as your browser's concerned you're only going forward one page.

Step 2
Choose a post in the Common Room, ANY post, and open the comment box (you won't be actually making a comment on the post, it's simply for using the facilities to find the necessary information). Act as if you were going to post the image from your computer (which you want to really post in the forums) into the Comment, so choose Img and browse to find your image and Submit. Then Preview the Comment to check that the image appears.

Step 3
Now comes the bit that may appear to be complicated, but it isn't, really, it takes more time to write or read than to do, so persist. The information you see next will appear slightly different depending on whether you have Firefox as your browser or Internet Explorer, or Safari (Mac users). Right-click on the image in the Preview of the (false) Comment and a drop-down menu of options will appear. Left-click on the option Properties. A pop-up window should appear and in that will be the details of the image's (temporary) online location, starting with http://. In Firefox, it is to the right of the word Location, in Internet Explorer it is to the right of the words Address: (URL). Double or triple-click on the address (the line of code that starts with http://) until it is all highlighted, then right-click and choose Copy. That will copy the image's online location to your clipboard.

Step 4
Using your browser's Back button, go back to the forum post you started. Internet Explorer users may get to a page which tells you that the page has expired: Click on the Refresh button (or press F5) and then Retry in the pop-up window and the draft forum post should reappear. Paste the text/code you've copied into your post where you want the picture, then highlight all of that text/code and click the Img button above the draft post box - that should surround the text/code with the [img] and [/img] tags. Now Preview your post and the image should be in there. If it is, you can either Submit the post or go back to typing something beneath the image and then submit it.

If the image isn't in your Previewed forum post, take a look at the code that is in there and try to work out what went wrong: For the image to appear there should be the starting code [img], followed by the online address of the image (eg http://websitename/.../picture.jpg - the ending of the code will be either .jpg, .gif, .JPG, .GIF or .png), followed by the ending code [/img].

Email me if you have any problems, or Comment on this.